What is a Reverse Osmosis (RO) Filter?
Reverse osmosis (RO) water filtration is one of the most popular and economical water filtering techniques available if you're searching for a water filter that will deliver great-tasting, fresh drinking water for your house or company. Reverse osmosis water filters function by forcing water through a semi-permeable membrane, which traps impurities that are then discharged down the drain. The remaining tap water gathers in a holding tank after the process is finished. If you want to enhance the taste, smell, and appearance of your water, reverse osmosis water filters are the optimal choice.
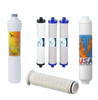
There are four phases of the purification process in the filtration of the tap water in your house or any water supply systems running throughout your home that is connected to the RO system and filter.
Phase One: This pre-filtration stage reduces fine, suspended debris that could clog the system in order to safeguard the membranes of the unit.
Phase Two: Since chlorine can harm thin film material membranes, the second stage of the process involves filtration to remove chlorine.
Phase Three: This membrane is semi-permeable and intended to filter out a wide range of pollutants that may be harmful or aesthetically undesirable. From here, the water enters a pressurized storage tank where the treated water is kept.
Phase Four: A carbon post-filtration phase, or "polishing stage," is typically the last step in the RO process and removes any aesthetic tastes or odors that may still be present.
Most RO filters will last anywhere from 3-5 years.
Every reverse osmosis system requires regular upkeep to keep the water quality high. The changing of filters on schedule is the most essential part of RO system maintenance. If RO filters and membranes are not replaced as directed, a clogged and damaged system can follow. Reverse osmosis filters typically need to be replaced every three to five years, though if it is still generating high-quality water, you might be able to keep them for longer.
Let's talk about how to change reverse osmosis filters now that you are aware of how frequently they should be changed. These guidelines are general; for further instructions, make sure to consult the filter's handbook or manual guide.
Replacement reverse osmosis filters come in a variety of sizes. Purchase the recommended filters to avoid damage to your filter's housing. Keep your replacement filters in their packaging once you've purchased them until you're ready to use them. The filter's lifespan will be shortened if you remove it too soon because it collects dust and air from its surroundings.
The filter will be inserted into a small, wet area. As a result, any bacteria that you touch the filter with will spread and develop. Be sure to properly wash your hands with water and soap before removing the filter from its packing and starting the installation process to prevent this.
You must first stop the flow of water. Than you must close the valves connecting to the storage tank and refrigerator in your system (if applicable). The reverse osmosis bypass valve should be opened (this will allow water to continue flowing to your faucet, avoiding the filter). A container, such as a small bowl, should be positioned beneath the filter housing. When you unscrew it, this will catch any water that may accidentally spill out of the system.
The various filter types are typically kept in separate compartments in reverse osmosis systems. There should be wording on the outside of each compartment describing what is within. Determine which of the aforementioned filters needs to be replaced, then locate the proper compartment to get ready for the next action.
At least one or two o-rings sometimes referred to as gaskets, are located close to the locations where each compartment screws in. A good time to check each o-ring for tears or other sorts of damage is right now. To prevent leaks, you should replace the o-ring if you see any damage. If everything appears to be in order, simply keep the o-rings in a secure location where they won't be misplaced or damaged. It should be quite simple to remove the old filter from its housing. This can be thrown in the garbage (make sure you look into your local disposal regulations so you throw it in the right bin).
After removing the old filter, thoroughly rinse the housing. If you haven't done this in a while, you might discover a ton of internal grime that has accumulated. If it's really caked on, you can probably get most of this off with a toothbrush; otherwise, you'll probably find that any debris comes off rather easily with water pressure from your faucet. Your replacement filter should fit in place easily. You probably picked the wrong-sized filter if it doesn't fit without you having to force it in. However, if everything fits as it should, your next action is to get the housing ready for